Amana UXT5530AAS Use and Care Manual
Browse online or download Use and Care Manual for Cooker hoods Amana UXT5530AAS. Amana UXT5530AAS Use & Care Manual User Manual
- Page / 28
- Table of contents
- BOOKMARKS
- HOTTE DE CUISINIÈRE DE 1
- TABLE OF CONTENTS 2
- TABLE DES MATIÈRES 2
- RANGE HOOD SAFETY 2
- IMPORTANT SAFETY INSTRUCTIONS 3
- Location Requirements 4
- Venting Requirements 5
- Wall cap 6
- ¹⁄₄" x 10" 6
- INSTALLATION INSTRUCTIONS 7
- Install Range Hood 9
- RANGE HOOD USE 10
- RANGE HOOD CARE 11
- WIRING DIAGRAM 12
- ASSISTANCE OR SERVICE 13
- AVERTISSEMENT 15
- EXIGENCES D'INSTALLATION 17
- Air d'appoint 18
- Méthodes d'évacuation 18
- Installation de la hotte 22
- ¹⁄₄" 23
- UTILISATION DE LA HOTTE 24
- ENTRETIEN DE LA HOTTE 25
- SCHÉMA DE CÂBLAGE 26
- ASSISTANCE OU SERVICE 27
- WHIRLPOOL CORPORATION 27
Summary of Contents
30" (76.2 CM) AND 36" (91.4 CM) RANGE HOODInstallation Instructions and Use & Care GuideHOTTE DE CUISINIÈRE DE 30" (76,2 CM) ET 36&
107. For non-vented (recirculating) installations: Remove screws and rear support. Remove the blower mounting screws. Push up on the blower to detac
11Range Hood ControlsOperating the lightThe On/Off light button controls both lights. Press once for On and again for Off.Operating the blowerThe Blow
12WIRING DIAGRAM WRBKGYBRYBKRWYBRWYRGYY/GY/GBKGYPush button boardSwitch operationPositionFunctionOffNo connectionLampsLow speedMed speedHigh speedGY/Y
13ASSISTANCE OR SERVICEWhen calling for assistance or service, please know the purchase date and the complete model and serial number of your applianc
14WHIRLPOOL CORPORATION MAJOR APPLIANCE WARRANTYLIMITED WARRANTYFor one year from the date of purchase, when this major appliance is operated and main
15SÉCURITÉ DE LA HOTTE DE CUISINIÈRERisque possible de décès ou de blessure grave si vous ne suivez pas immédiatement les instructions. Risque possibl
16IMPORTANTES INSTRUCTIONS DE SÉCURITÉLIRE ET CONSERVER CES INSTRUCTIONSAVERTISSEMENT : POUR RÉDUIRE LE RISQUE D'INCENDIE, CHOC ÉLECTRIQUE OU DOM
17EXIGENCES D'INSTALLATIONOutils et piècesRassembler les outils et composants nécessaires avant d’entreprendre l’installation. Lire et observer l
18Dégagements de séparation à respecterExigences concernant l'évacuation (Uniquement pour modèles avec évacuation) Le système d'évacuation
19Calcul de la longueur effective du circuit d'évacuationPour calculer la longueur effective du circuit d'évacuation nécessaire, additionner
2TABLE OF CONTENTSRANGE HOOD SAFETY ...2INSTALLATION REQUIREMENTS...
20Spécifications électriquesIMPORTANT : La hotte doit être correctement reliée à la terre en conformité avec les codes et règlements locaux en vigueur
21INSTRUCTIONS D'INSTALLATIONPréparation de l'emplacementREMARQUE : Pour les installations avec décharge à l’extérieur, on recommande d&apos
223.Utiliser une scie sauteuse ou une scie à guichet pour découper l'ouverture rectangulaire du système d’évacuation dans le mur.Style 2 – Découp
233. Installations avec décharge à l'extérieur : Selon votre installation, retirer l'opercule rectangulaire supérieur ou arrière du conduit
24 Installer les filtres à charbon. Voir la section “Entretien de la hotte”.8. À deux personnes, soulever la hotte jusqu'à sa position finale, t
25ENTRETIEN DE LA HOTTENettoyageIMPORTANT : Nettoyer fréquemment la hotte et les filtres à graisse en suivant les instructions suivantes. Réinstaller
26SCHÉMA DE CÂBLAGEBLRNGRISMARJANRBLJAMARRJAJA/VEJA/VEBLNGRISGRISCarte bouton-poussoirFonctionnement du commutateurFonctionConnexionInactifPas de conn
27ASSISTANCE OU SERVICELors d’un appel pour assistance ou service, veuillez connaître la date d’achat, le numéro de modèle et le numéro de série compl
10. La dépose et la réinstallation de votre gros appareil si celui-ci est installé dans un endroit inaccessible ou n'est pas installé conformémen
3INSTALLATION REQUIREMENTSTools and PartsGather the required tools and parts before starting installation. Read and follow the instructions provided w
4 4 - 8 x 40 mm wall anchors Recirculating kit Charcoal filters for non-vented (recirculating) installations. See the “Assistance or Service” secti
5Venting Requirements (Vented Models Only) Vent system must terminate to the outdoors, except for non-vented (recirculating) installations. Do not t
6Example vent system3¹⁄₄" x 10" (8.3 cm x 25.4 cm) Vent SystemExample vent systemElectrical RequirementsIMPORTANT: The range hood must be el
7 The grounded 3 prong outlet is to be located inside the cabinet above the range hood at a maximum distance of 33⁷⁄₁₆" (85.0 cm) from where the
8Style 1 - Cut Openings for 3¼" x 10" (8.3 cm x 25.4 cm) Rectangular Vent SystemRoof VentingTo make a 4¼" x 10½" (10.8 cm x 26.7 c
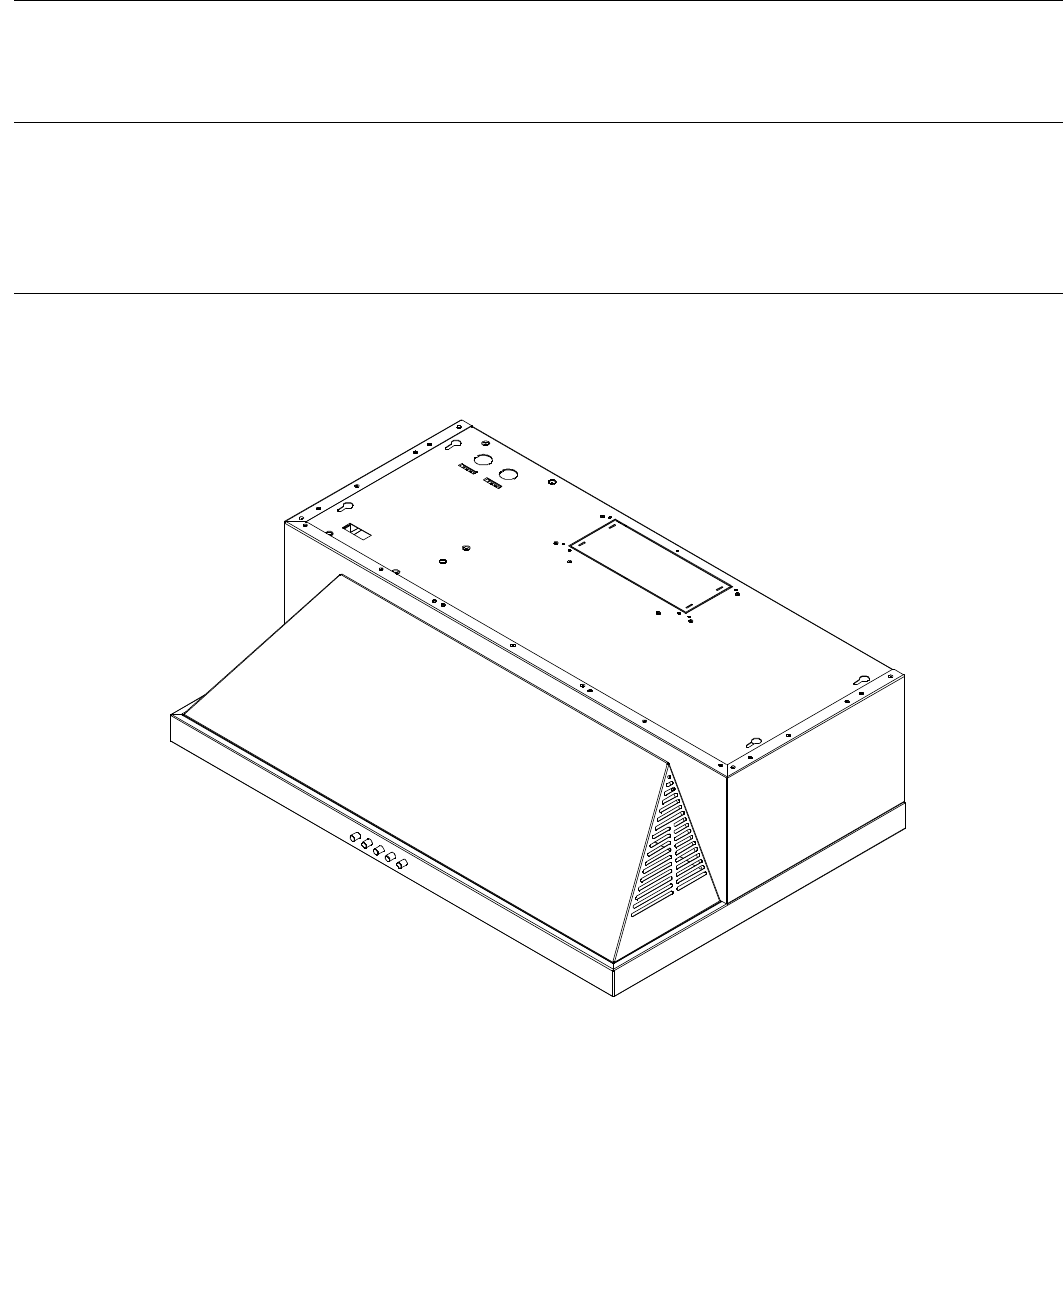
9Install Range Hood1. Remove the grease filters. See the “Range Hood Care” section.2. Remove mounting screws and lateral supports.3. For vented instal
Related products and manuals for Cooker hoods Amana UXT5530AAS

 (30 pages)
(32 pages)
(24 pages)
(30 pages)
(32 pages)
(24 pages)
© 2020, manymanuals.com. All rights reserved. | 2.750 s |
 Manymanuals.com
 Manymanuals.de
 Manymanuals.fr
 Manymanuals.it
 Manymanuals.pl
 Manymanuals.cz
 Manymanuals.es
 Manymanuals-pt.com
Comments to this Manuals